Overview
This guide explains how to use Pangolin and Traefik as a local reverse proxy without Gerbil and its tunneling features. The second (optional) part will expand on this and show how to enable tunneling by setting up Gerbil. All containers are available in the Unraid Community Apps (CA) store. If you’re not familiar with Unraid, you can find more information on their website. This installation has a lot of moving parts and is a bit non-standard for Unraid because Pangolin and its components were designed to run as micro-services on a VPS in tunneling mode. However, some may want to use “Local” reverse proxying on their Unraid server or use their Unraid server as a tunnel controller with Gerbil. For either of these use cases, follow the steps outlined in this guide.Prerequisites
- A working Unraid server.
- A domain name with access to configure DNS and the ability to port forward on your network.
- The networking is the same as for the VPS, just on your local network, so please refer to networking page for more info.
Create a Docker Network
Before starting, create a new docker network on Unraid. This will simplify things, and allow the containers to communicate with each other via their container names. If you already have a network, there is no need to create another one.- Open the web terminal in Unraid.
- Run the following command:
You can use any name you want for the network. We will use
mynetwork in this guide.1. Setup Pangolin and Traefik
This first part will enable Pangolin to work in “Local” reverse proxy mode. Newt and WireGuard will not be able to be used after finishing this first part. However, if you want to use those features, you still need to follow this first part of the tutorial because we show how to set up Pangolin and Traefik first.Install and Setup Pangolin
1. Create the Config Files
Pangolin uses a yaml file for configuration. If this is not present on start up, the container will throw an error and exit. Create aconfig.yml file in the config folder.
See the Configuration section for what to put in this file.
2. Install Pangolin via the CA Store
3. Configure Pangolin
Set the network to the one you created earlier.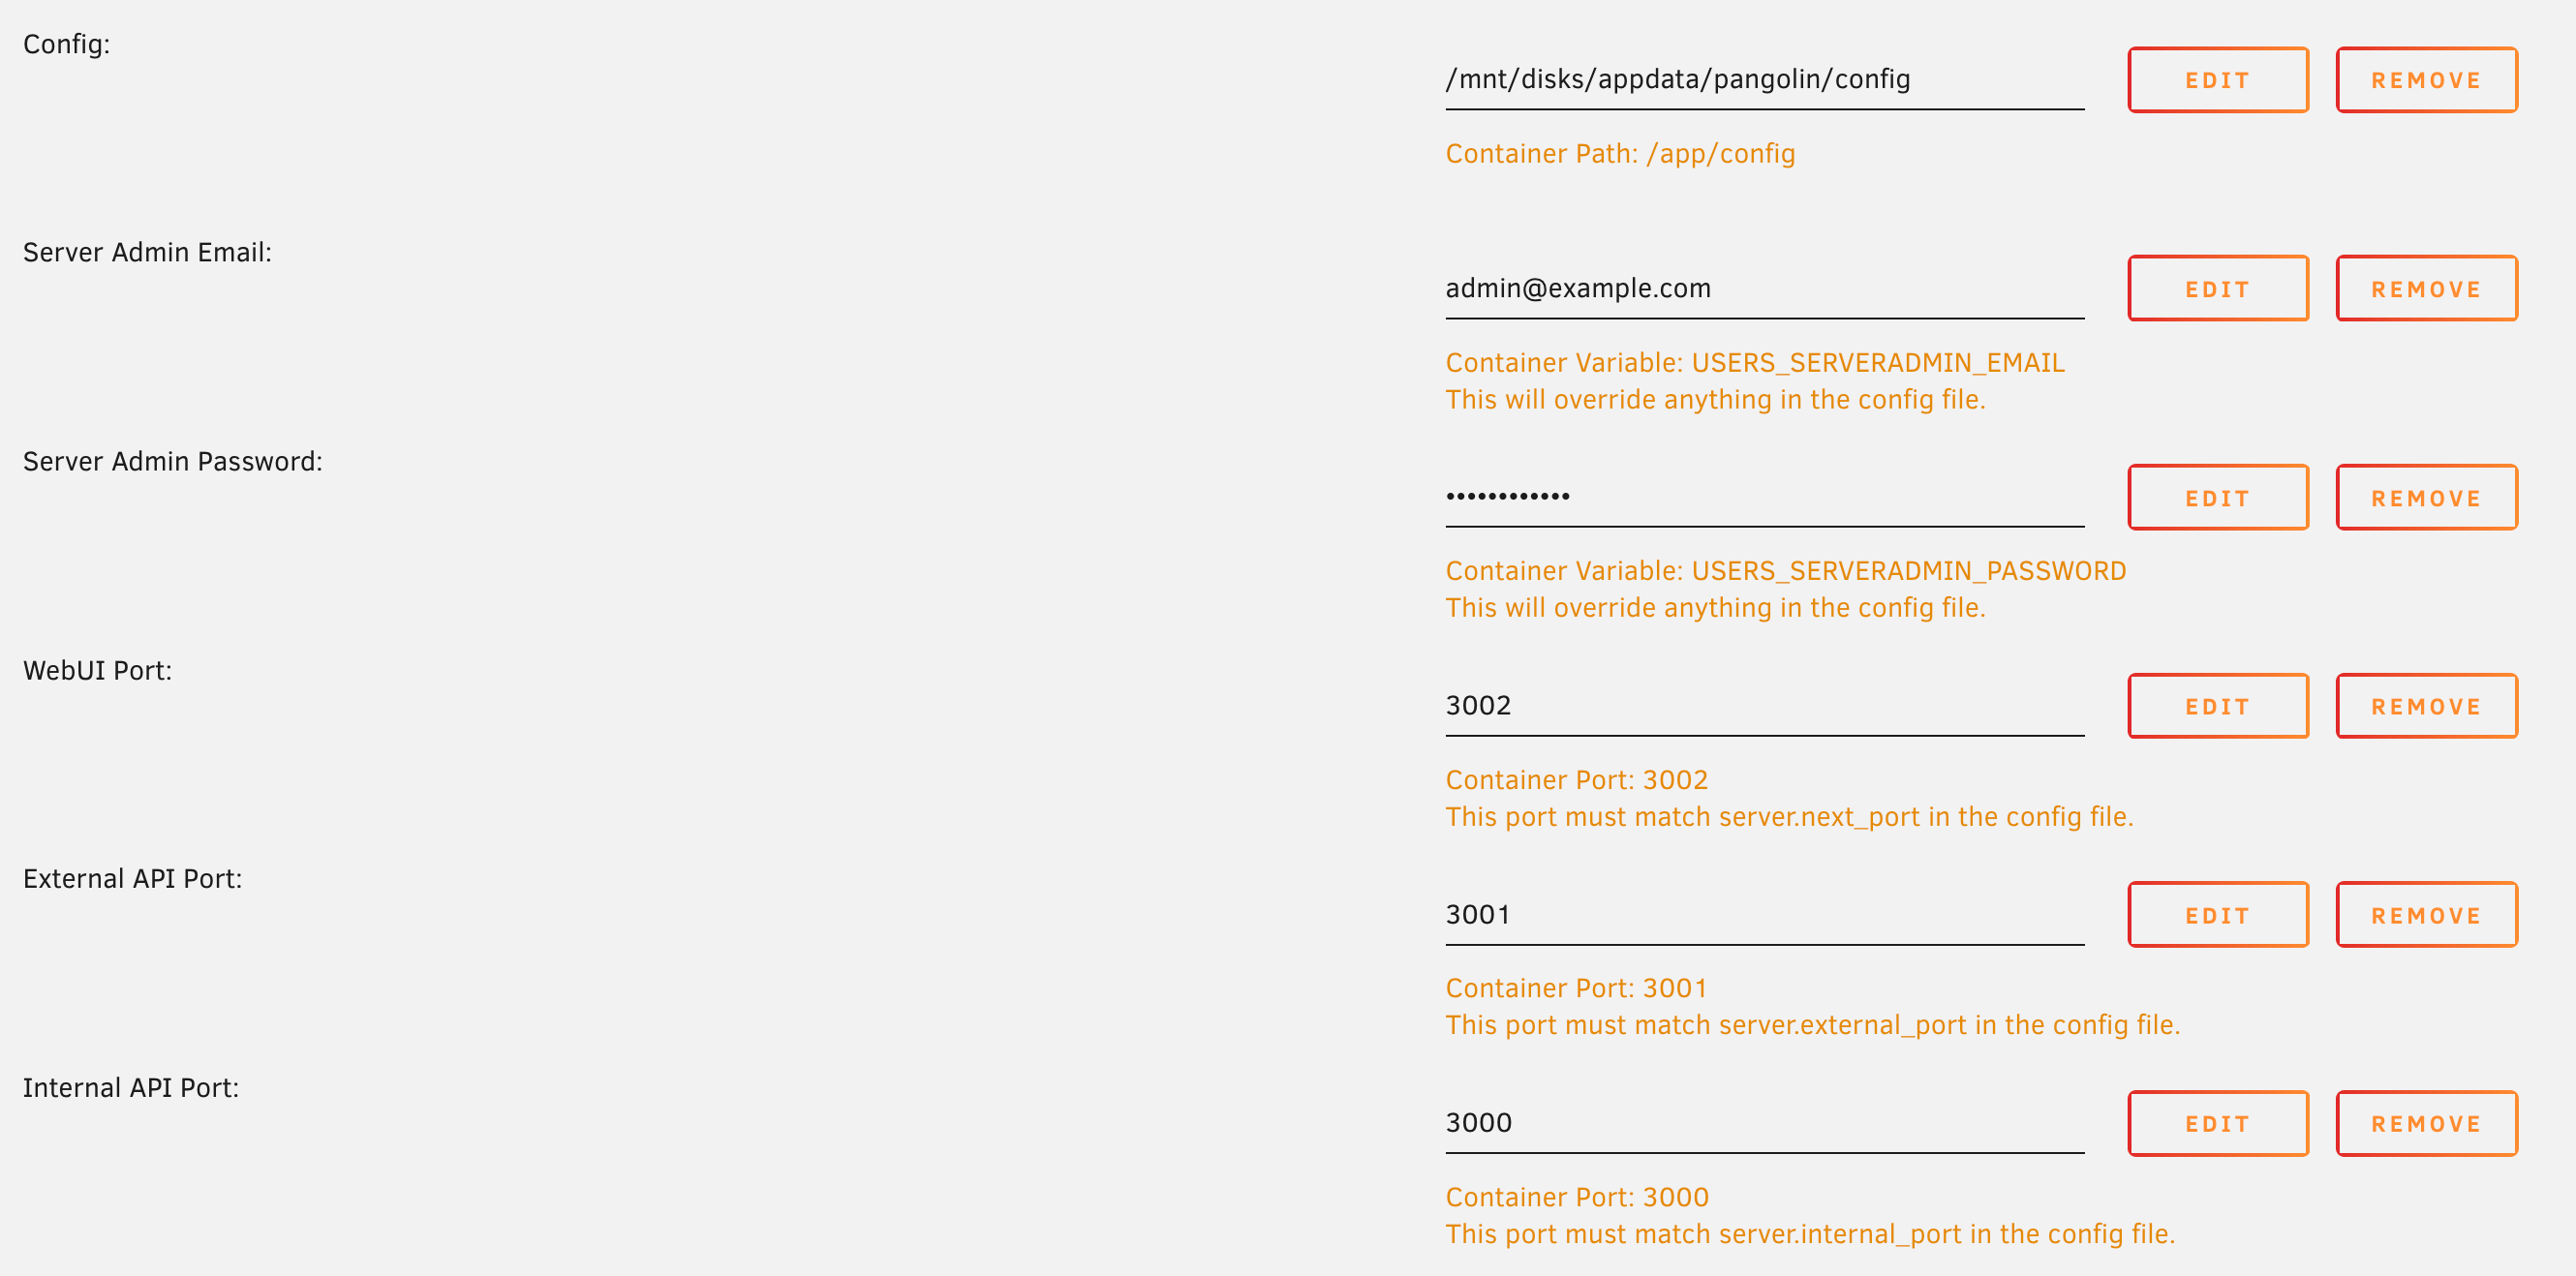
Pangolin configuration settings in Unraid
- Click edit on the port
- Set the “Container Port” to the new port you want to use
- Set the “Host Port” to the new port you want to use
- Edit Pangolin’s config file and set
server.next_portto the new port you want to use
4. Start the Pangolin Container
Pangolin will not start without a config file. If you have not created the config file or the config file is invalid, the container will throw an error and exit.
5. Log in to the dashboard
After successful installation:- Complete the initial admin user setup via the dashboard at
https://<your-domain>/auth/initial-setup - You can log in using the admin email and password you provided
- Create your first “Local” site for local reverse proxying
Install and Setup Traefik
Before starting with Traefik, shut down the Pangolin container.1. Create the Config Files
Update the appdata path with new files for Traefik. At this point there may be some extra files generated by Pangolin.pangolin/config/traefik/traefik_config.yml:
"pangolin/config/traefik/traefik_config.yml
pangolin/config/traefik/dynamic_config.yml:
The dynamic configuration file is where you define the HTTP routers and services for the Pangolin frontend and backend. Below is an example configuration for a Next.js frontend and an API backend.
The domain you enter here is what will be used to access the main Pangolin dashboard. Make sure you have the DNS set up correctly for this domain. Point it to the IP address of the server running Pangolin.
pangolin/config/traefik/dynamic_config.yml
2. Install Traefik via the CA Store
This section will use the Traefik template from the “IBRACORP” repository. If you already have a Traefik installation running, you should manually configure your Traefik config to work with Pangolin.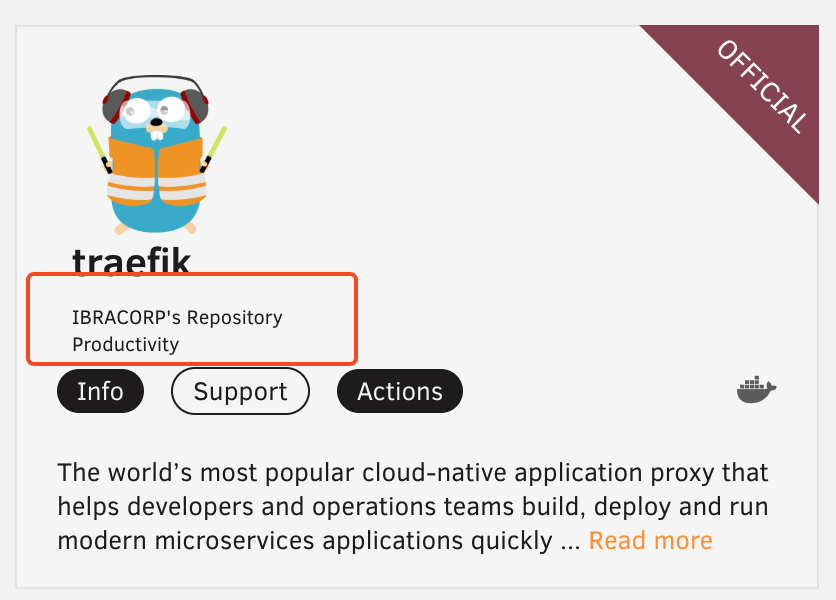
Traefik repository selection in Community Apps
3. Configure Traefik
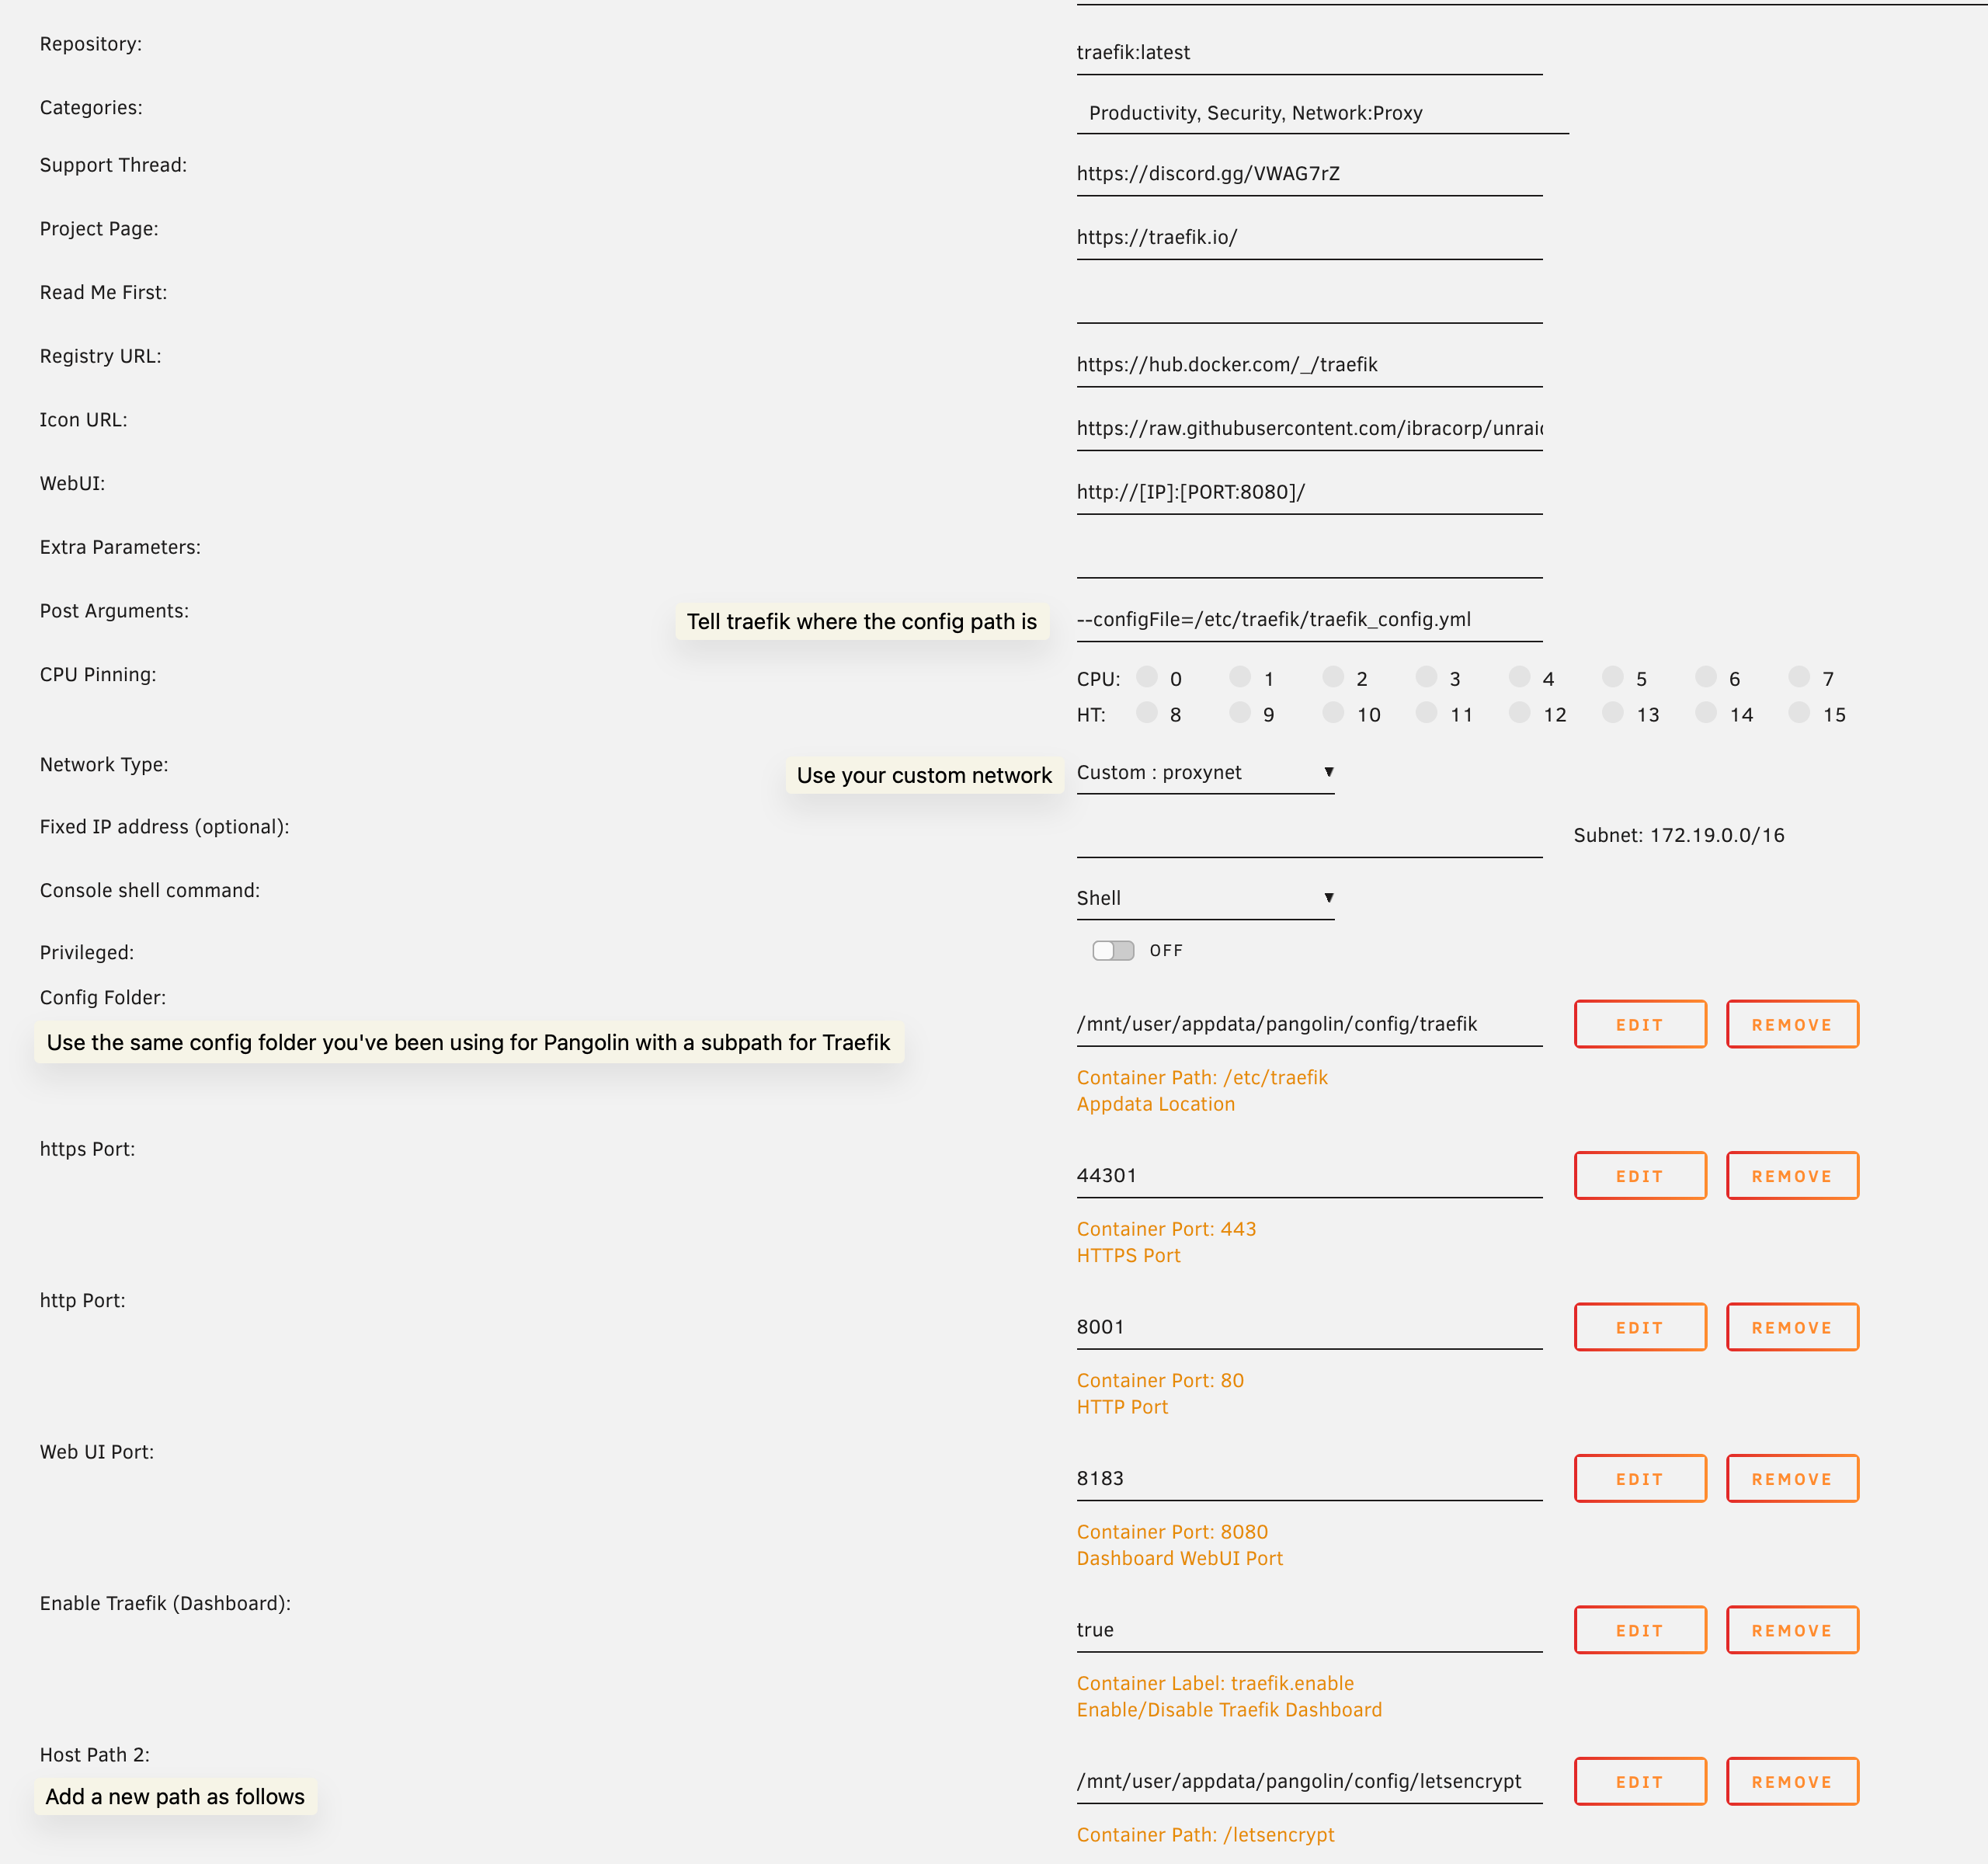
Traefik configuration settings in Unraid
Please refer to the official Traefik docs for more information on the Traefik configuration beyond this guide.
/traefik, like this: <appdata>/config/traefik.
Lets Encrypt (Host Path 2 in screenshot):
Traefik will store the certification information here. You can make this path anywhere you want. For simplicity, we’re placing it in the same config path at <appdata>/config/letsencrypt.
Ports:
You will need to port forward the https and http ports listed in the config on your network’s router.
4. Port Forwarding
You will need to port forward the ports you set in the Traefik config on your network’s router. This is so that Traefik can receive traffic from the internet. You should forward 443 to the https port and 80 to the http port you set in the Traefik config.2. Add Gerbil for Tunneling (Optional)
If you do not want to use the tunneling feature of Pangolin and only want to use it as a local reverse proxy, you can stop here.
1. Install Gerbil via the CA Store
2. Configure Gerbil
Set the network to the one you created earlier.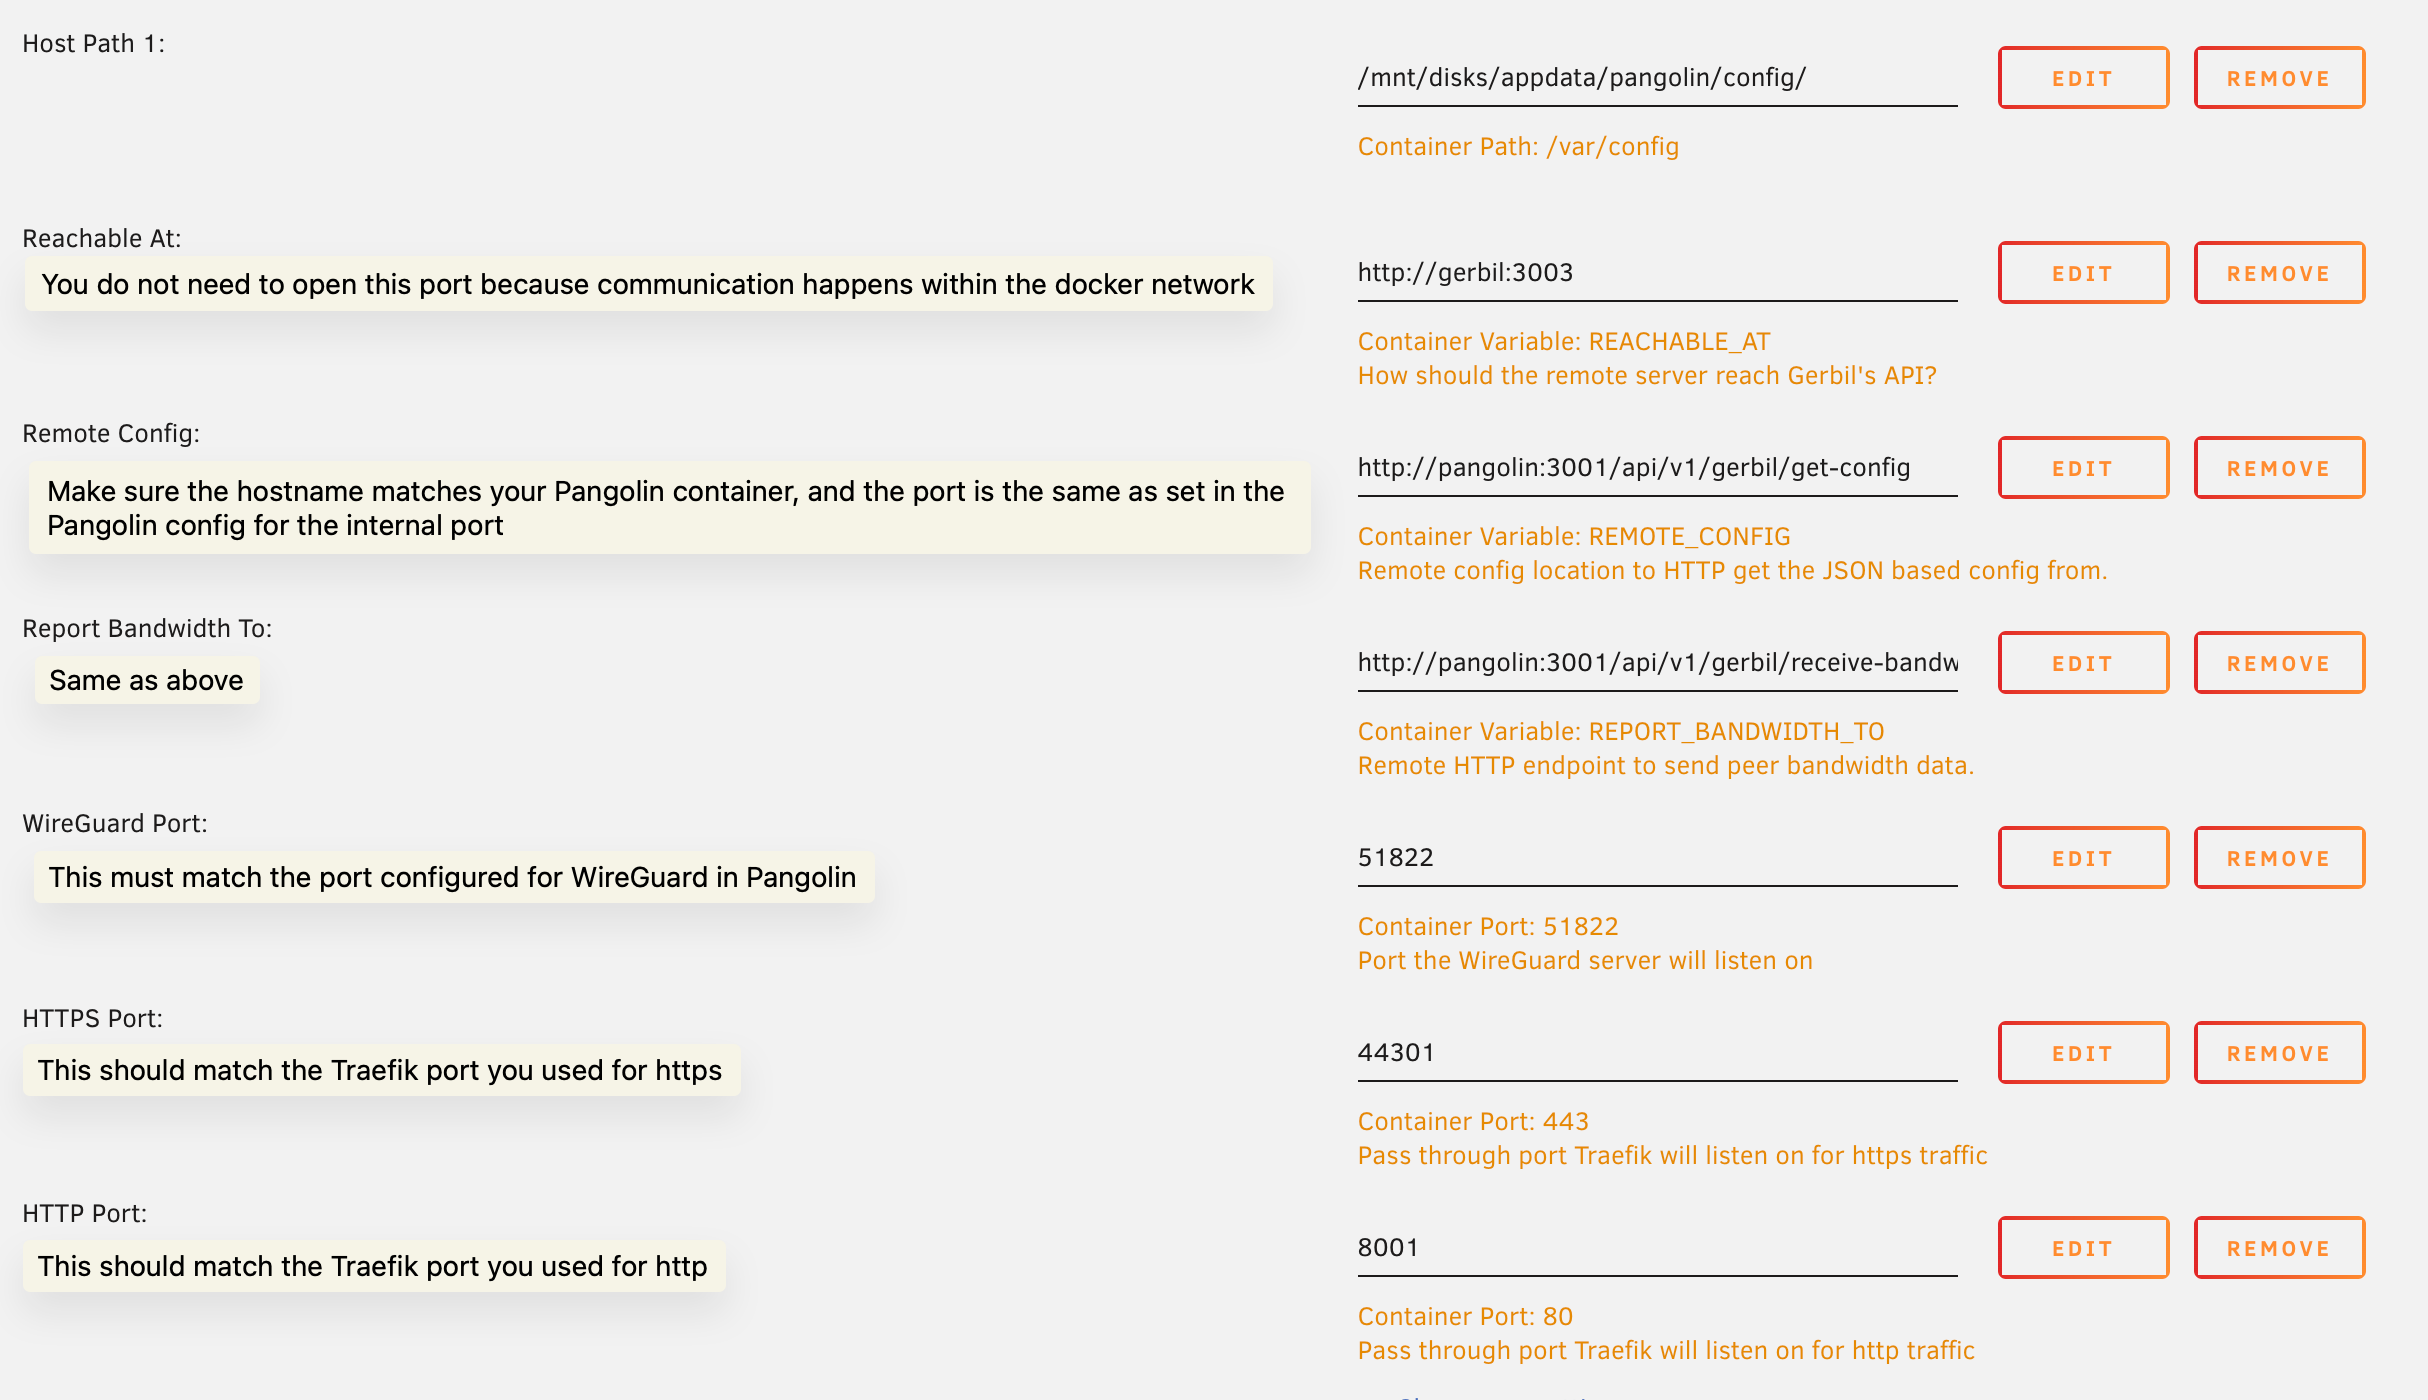
Gerbil configuration settings in Unraid
http://pangolin:3001 must match. The hostname should be the name of the Pangolin container on the docker network you’re using. This is because it is routed using the internal docker DNS address. The port must also match the port you have set for the internal port in Pangolin. These defaults will work unless you changed these values earlier when setting up Pangolin.
WireGuard Port:
You must use the default port of See this GitHub issue comment for more details.
51822 for WireGuard in the Gerbil container. Using any other port may cause connection issues that are difficult to debug.Make sure this is also reflected in your Pangolin config.yml:3. Network Traefik Through Gerbil
As discussed earlier we need to network Traefik through Gerbil. This is pretty easy. We will do all of this in the Traefik container settings. Toggle advanced settings, and add the following to the “Extra Parameters” section.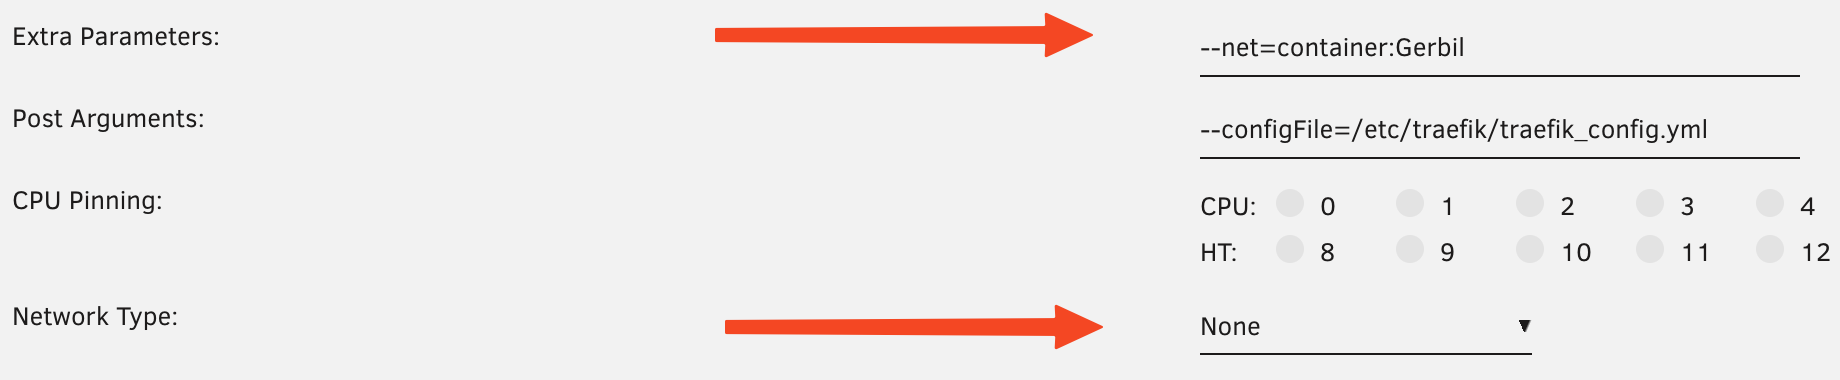
Traefik networking configuration through Gerbil
4. Start the stack
We recommend to start the whole stack in the following order:- Pangolin
- Gerbil
- Traefik
5. Port Forwarding
You will need to port forward the WireGuard port you set in the Gerbil config on your network’s router. This is so that the client can connect to the server.6. Verify Tunnels are Functional
Your logs for Gerbil should look something like this:You probably won’t have the peer connection messages but in general, you should see the WireGuard interface being started.

Gerbil logs showing WireGuard interface startup