Client support in Pangolin is still in beta - things may not perform as expected. If you encounter bugs please report them on GitHub in an issue.
How Clients Work
The Connection Process
- Client Creation: You create a client in Pangolin’s dashboard
- Olm Registration: Olm registers with Pangolin using the client credentials
- Tunnel Establishment: Olm establishes a WireGuard tunnel to your network
- Resource Access: You can access resources on your private network through the tunnel
What Clients Are
- A way to tunnel your computer back into your whole network
- Remotely access non HTTP resources like file shares
- A bastion host or “jump box” to manage servers
What Pangolin Clients Are Not (Yet)
- A mesh VPN like Tailscale, Netbird, or Netmaker
- A slick desktop UI (coming soon)
Prerequisites
Before adding a client, ensure you have:-
Updated Components: Make sure you have the required versions:
- Pangolin ^1.8.0
- Gerbil ^1.1.0
- Newt ^1.4.0
-
Site Configuration: Your Newt site must be configured to accept clients with the
--accept-clientsflag orACCEPT_CLIENTS=trueenvironment variable. -
Port Configuration: Ensure port 21820 is open on your VPS and added to your
docker-compose.yml:
docker-compose.yml
Adding a Client
1
Navigate to Clients
In the Pangolin dashboard, go to the Clients section and click Add Client.
2
Configure client details
Configure the basic information:
- Client Name: A descriptive name for your client
3
Generate Olm credentials
Pangolin will generate:
- Client ID: Unique identifier for the Olm client
- Secret: Authentication secret for secure connection
- Endpoint: The Pangolin server endpoint
4
Install Olm
Use the generated credentials to install and configure Olm on your remote computer. See Install Olm for detailed instructions.
5
Configure resources
Create client resources for what you would like to access through the client. For example, to SSH into a server, create a resource like
22:localhost:22.6
Verify connection
Once Olm is running, the client status should show as “Online” in the dashboard. You can then connect to your network using the site’s IP address.
Client Modalities
Clients have two major operation modalities:Relaying (Default)
By default, Olm will relay traffic through your Pangolin VPS - through Gerbil specifically. Gerbil listens on UDP port 21820 for new WireGuard connections and forwards the packets down the Newt site tunnels to the right peers. This means your connections back to your site do not require firewall config and uses the existing NAT holepunching capabilities of Newt.NAT Hole Punching (Experimental)
Right now NAT hole punching is EXPERIMENTAL. While functional, it does not always connect reliably and can fall back to relaying. We plan to work to improve the reliability over time by implementing more methods for those behind CGNAT or hard nats.Take a look at Tailscale docs for some firewall changes you might be able to make to improve HP performance.
--holepunch in Olm. Instead of immediately relaying through the VPS, this will attempt to connect directly to the Newt site across NAT routers.
This should help to:
- Increase performance (speed/bandwidth)
- Reduce VPS transit costs
Site Modalities
Sites have two operating modalities when accepting clients:Proxy Mode
When you run Newt with--accept-clients it will run fully in user space. This means you do not need to give the container or binary any special permissions. It will NOT create a virtual network interface on the host. Instead you should create client resources in Pangolin to configure what ports clients can hit and where they should go.
Native Mode
Right now native mode only works on Linux.
--accept-clients and --native, Newt will create a native Linux tunnel interface on the host. This means that all traffic destined for the site can access anything on the host.
Remote Subnets
In native mode, you can add remote subnets to the site settings in Pangolin to forward remote networks through Newt. This can let Newt act as a traditional VPN server to route to anything on your local network.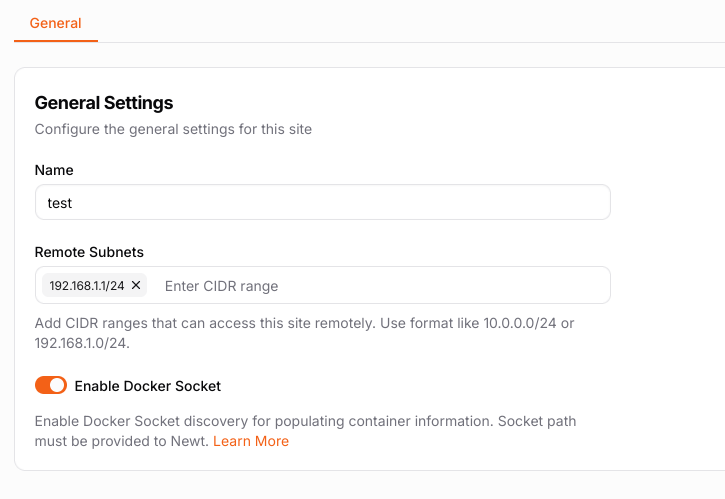
Pangolin UI showing remote subnets for clients.
- Olm forwards packets: Your computer running Olm blindly forwards all packets destined for the remote subnet (e.g., 192.168.0.x) over the tunnel
- Newt receives packets: Newt creates a WireGuard network interface on the Linux host and receives these packets
- Linux must route packets: The Linux machine needs to know what to do with packets destined for 192.168.0.x
Required Configuration
Enable IP forwarding:Troubleshooting Routing Issues
If you can connect to Newt (peer shows as connected in logs) but can’t reach remote subnet resources:- Check if packets reach the destination: The connection to Newt is working, so this is likely a routing issue
- Verify forwarding is enabled: Use
sysctl net.ipv4.ip_forwardto confirm it’s set to 1 - Check iptables rules: Ensure NAT masquerading is configured
- Consider using proxy mode: Client resources can be easier as Newt handles the proxying, though you’ll need to address everything as the Newt IP and assign specific ports
NAT masquerading can affect other services on the Linux instance, so be aware of potential conflicts with existing network configurations.
Notes
- Clients require Olm to be running on the remote computer
- Each client can access multiple resources on the site
- Connection status is monitored automatically
- Olm creates a native tun interface and usually requires sudo/admin permissions
- On Windows: Olm will run as a service
- LXC containers need to be configured to allow tun access